
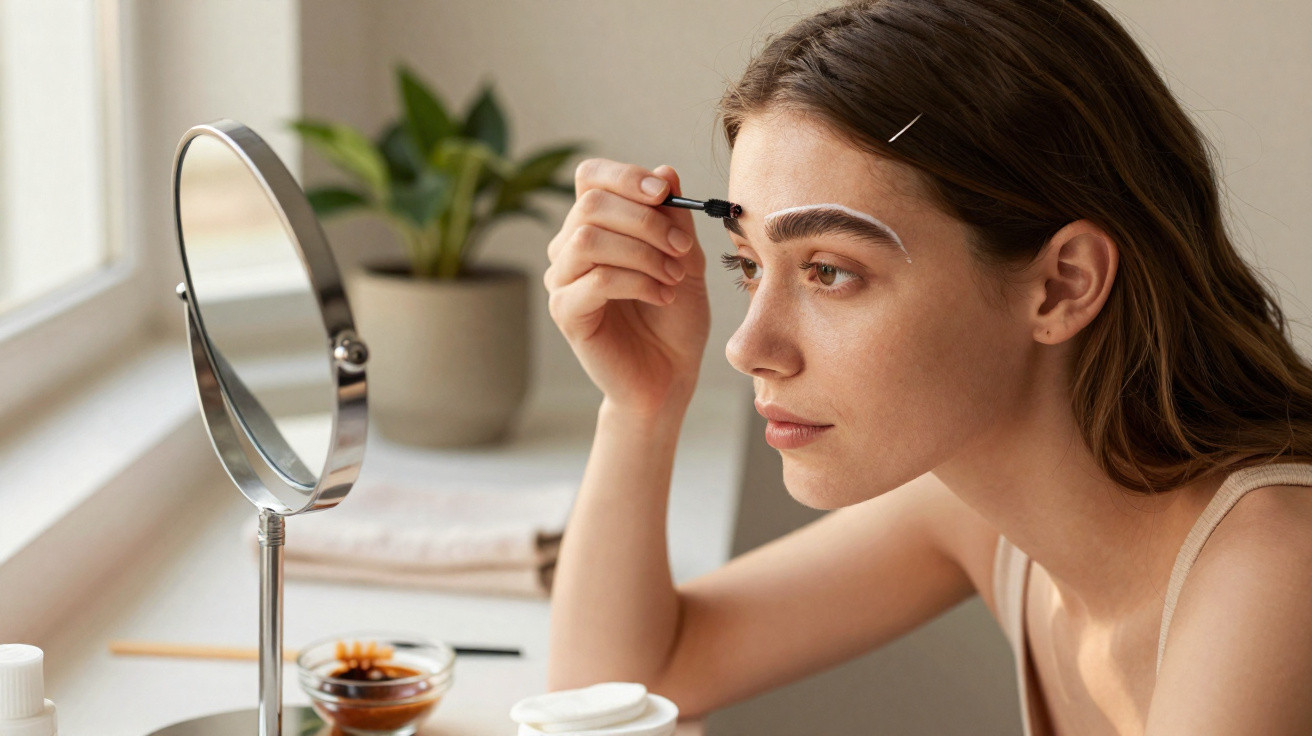
At-home eyebrow tinting has moved from a little-known trick to an everyday routine, particularly for anyone chasing tidy, natural-looking brows without the ongoing cost and time of salon visits. Thanks to kinder formulas and straightforward guidance, tinting and shaping your brows now feels much like doing your nails at home: a bit daunting the first go, then surprisingly satisfying once it clicks.
Why soft, natural brows are setting the tone
Those thick, sharply defined “Instagram brows” are on the way out, making room for gentler, more realistic arches. Plenty of people still want added definition-just not the dense, painted finish that can read harshly in daylight or under a camera.
Instead of transforming your brows, tinting at home aims to quietly enhance what you already have.
If you have lighter hair, thin tails, or patches left behind from past over-plucking, a subtle tint can create depth without committing to semi-permanent makeup. It can also cut down your reliance on daily pencils and powders, which may smudge or fade by mid-afternoon.
The wider cost-of-living squeeze plays a role too. Frequent salon appointments can become expensive quickly, whereas one at-home kit often lasts for several months of DIY eyebrow tinting. That low cost per use has helped at-home eyebrow tinting become a sensible grooming choice, rather than a one-off beauty experiment.
Setting up for success: prep before you tint
A steady, well-organised setup can be just as important as the tint you choose. Most slip-ups happen when you rush.
Choosing the right shade for your brows
If you want to avoid brows that look “drawn on”, don’t go too dark. Many brow specialists stick to an easy guideline: match your natural tone or choose something a touch softer.
- Blonde or light brown hair: go for taupe, light brown, or a soft ash brown.
- Medium brown hair: stay close to your own shade, or go one shade deeper for extra definition.
- Dark brown or black hair: a cool-toned dark brown typically looks more natural than jet black.
- Red or auburn hair: a warm brown with a hint of copper often blends best.
When unsure, pick the lighter option; you can always deepen the colour next time.
Skin safety and patch testing
Because eyebrow tinting sits so close to the eyes, skin compatibility isn’t optional. Doing a patch test at least 24 hours beforehand lets you catch any reaction before it ends up on your face.
Most kits suggest mixing a small amount of tint and applying a tiny dab behind the ear or on the inner arm, then leaving it to develop for the time stated in the instructions. If you notice itching, burning, or redness, don’t use that product.
Cleaning the canvas
For smooth, even colour, your brows need to be free from residue. Oils, moisturiser, SPF, and makeup can all stop tint from properly taking to the hairs.
Wash your face first, then lightly cleanse the brow area using a non-oily remover. Make sure the skin is completely dry. Skip heavy creams on the forehead beforehand, as they can migrate into the brow area and weaken the dye.
Step-by-step: an easy method for soft, defined brows
Aim for a predictable result, not a shock. A measured, step-by-step approach helps you keep the finish soft and even.
Shielding the skin
Before you apply any tint, smooth a slim line of petroleum jelly or a rich barrier balm around the brows-avoiding the hairs themselves. Think of it as a neat boundary: it reduces staining on the skin and helps you keep the edges clean.
Mixing and applying the tint
Most at-home kits come with a colour cream and an activator. Only mix the amount you’ll use; typically, a pea-sized quantity per brow is plenty.
Use a small angled brush or the applicator included in the kit for maximum control, especially around the arch and tail.
Begin at the tail, which usually suits the deepest shade, then move towards the arch. Leave the inner third until last and apply less product there. This creates a natural gradient rather than a solid, blocky shape.
Step back from the mirror as you work. Small fixes-like removing a smudge with a cotton bud-are far easier while the tint is still wet.
Timing the development
Processing times vary by product, but most home eyebrow tints develop in 5–10 minutes. Use a timer instead of estimating, and avoid leaving it on “a little longer”-that’s often how softly defined brows become unintentionally heavy.
| Desired effect | Suggested timing* |
|---|---|
| Very subtle, first-time tint | 3–5 minutes |
| Soft definition | 5–7 minutes |
| Stronger, bolder effect | 7–10 minutes |
*Always follow the maximum time recommended on your specific product.
To remove, wipe away the tint with a damp cotton pad, following the direction of hair growth. Don’t scrub: harsh rubbing can irritate the skin and pull off too much colour at once.
Keeping your tinted brows soft, healthy and natural
Putting the kit away isn’t the end of the process. Aftercare influences both how the colour wears and how your brow hairs feel.
The first 24 hours after tinting
For roughly the first 12 hours, try not to soak the brow area. Steam from hot showers, heavy workouts, and swimming can all reduce longevity on day one.
Gentle care during the first night often means a more even fade over the next few weeks.
Keep scrubs, acids, and retinoids away from your brows for a day or two. These can speed up fading and may be too strong on freshly tinted skin.
Longer-term maintenance
In most cases, tint lasts two to four weeks, depending on your skin type, skincare habits, and sun exposure. Oilier skin and frequent exfoliation tend to fade pigment faster.
Between sessions, applying a light brow oil or conditioning serum can help keep hairs supple and reduce brittleness. Castor oil, argan oil, and dedicated brow treatments are popular-used sparingly at night.
Leaving three to four weeks between tinting sessions gives the hairs time to recover and helps prevent the colour building up too dark over time.
What to do when things go slightly wrong
Even when you’re careful, DIY beauty can surprise you. Eyebrow tinting is no different, but most issues are manageable.
If your brows look too dark
If you rinse off the tint and feel a moment of panic, don’t assume it’s permanent. The shade often relaxes over 24–48 hours as you cleanse your face and natural oils return.
You can lightly wash the area with a gentle cleanser, or use micellar water on a cotton pad to lift some pigment. Some people carefully use a small amount of clarifying shampoo or a mild exfoliating toner around-but never in-the brow area, taking extra care to keep everything away from the eyes.
If the shape feels off
A shape problem usually comes from tint spreading beyond your natural brow line. If you spot it quickly, use a damp cotton bud to clean up the edge while the tint is still processing. Once the colour has developed, any staining on the surrounding skin generally fades within a couple of days, especially with gentle cleansing and makeup remover.
If you need a bigger correction, leave tweezing or trimming until you’ve rinsed and dried the brows completely. Trying to tidy and tint at the same time can lead to accidental over-plucking.
Key terms and how they affect your results
Eyebrow tinting kits often include language that sounds more complicated than it is. Knowing what these terms mean makes it easier to choose products confidently.
- Developer/activator: the liquid or cream that makes the tint process. Stronger developers may create quicker, deeper colour.
- Oxidative dye: a common type of tint that develops over a few minutes once combined with a developer.
- Patch test: a small test applied to the skin to check for allergies or irritation before full application.
- Henna brow tint: a plant-based option some people prefer; it stains both the skin and the hair and can give a more filled-in look.
If your skin is highly reactive, or you have existing conditions such as eczema, read ingredient lists closely. You may also want to speak to a dermatologist before using any brow dye, even when tinting at home.
Where tinting fits alongside other brow routines
Brow tinting tends to work best when it supports light grooming, rather than replacing it altogether. A quick tidy with tweezers under the arch, trimming hairs that are too long, or an occasional professional shape can keep your natural brow line consistent and flattering.
Some people also pair tinting with minimal makeup: a clear or tinted brow gel to set hairs, or a pencil used only where brows are sparsest. In that setup, the tint creates the base shade, while makeup adds everyday polish without looking heavy.
Used thoughtfully, at-home tinting turns brows from a high-maintenance feature into a nearly set-and-forget part of your routine.
For many, that small change-from drawing on brows hair by hair each morning to giving them a quick glance and heading out-feels like a subtle but meaningful upgrade to daily life.


Comments
No comments yet. Be the first to comment!
Leave a Comment